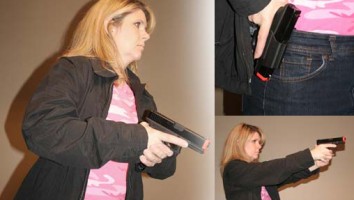
The slowest part of drawing a handgun from concealment involves getting your hand on the gun. Once it's in your grasp, you can get it out and on target relatively quick. There are a number of ways handguns are carried concealed in belt, ankle, shoulder and pocket holsters. Some carry in a purse or fanny pack. Regardless, there are six steps and two phases of a smooth and speedy draw from concealment. No matter how the gun is carried the process is the same.
Phase One: Preparation
Step 1. Orient yourself towards the threat.
Step 2. Clear the cover garment or open the carry compartment.
Step 3. Place you hand on the gun and establish a shooting grip.
If you use belt carry and are wearing a long shirt the first thing you would do is assume a shooting stance, oriented towards the threat. Then, with your weak hand, reach across your body and lift the shirt above the handgun's grip. Once the handgun is free of concealment, use your strong hand and establish a shooting grip on the handgun. This is the completion of Phase One. With practice, all three steps should become one fluid motion. It also establishes a reassessment point; you may realize actually drawing the handgun is not prudent at this exact moment.
Step two will vary slightly depending on your method of carry. If you are wearing an open front jacket, sweep the jacket out of the way with your strong hand. For cross-draw or shoulder holsters, sweep or open the jacket with your weak hand. If you are using a purse or pouch, open the compartment, ideally with your weak hand. If you use an ankle holster, step one would involve dropping to one knee while orientating towards the threat. Step two would be lifting your pants leg above the holster.
Phase Two: Execution
Step 4. Pull the hand gun completely from the holster.
Step 5. Orient the gun towards the threat and establish a two hand grip.
Step 6. Thrust the gun towards the threat as you make a final situation assessment.
If the situation dictates completing the draw, pull the handgun up so the muzzle clears the holster as you move your weak hand near the center of your chest. Now, rotate the gun so the muzzle is orientated towards the threat while bringing it near the center of your chest and establishing a two hand grip. (You want both hands on the gun as soon as possible. You don't want to drop it or get it taken away from you.) Finally, thrust the handgun towards the threat as you make your final assessment of the situation.
Initial practice should start with a for damn sure unloaded gun. Start by slowly working through the first three steps and then backing off. After you feel you are comfortable at establishing a good grip, complete the draw-stroke from step one to six. Before you try to add in live fire, practice this for about ten minutes every day for a week. You will be surprised how fast, smooth will make you.
How fast should you be? When it really matters you can never be fast enough but if you go to fast you might make a mistake. In training classes my advice has always been to go slow but go slow as fast as you can. Smooth means fast!


