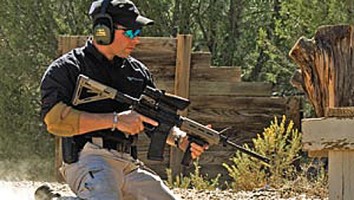
There are four basic field shooting positions—standing, kneeling, sitting and prone. Standing is the high position and provides the most mobility. Kneeling and sitting are intermediate positions used to lower your profile and take advantage of cover. The prone position is the lowest and most stable. Though some guidelines exist, the determining factors with regard to assuming each position correctly are accuracy and comfort.The purpose for employing a rifle determines the way positions are used and assumed. For example, hunters and bullseye shooters shoot from a more erect standing position than tactical-team members or 3-gun competitors.First, recognize that all shooters will not be comfortable or shoot the best from the same position. Since our bodies are different, one shooter may assume positions differently than another. Some of us are built like racehorses, others like draft horses and some like mules or miniature ponies. Therefore, your ability to obtain hits with speed and accuracy should dictate how you deal with each position.What follows is a brief synopsis of field shooting positions. Their configuration, application and use with barricades are addressed. This information is partly based on the Gunsite Academy "Carbine Handbook," and partly on experiences in the field and while instructing military, police and civilian shooters.
Ready Positions
When not engaging targets, an AR is held in the ready position. Gunsite teaches two such non-engagement orientations—the ready and indoor ready. Regardless of the ready position, the safety is always on and the finger is kept out of the trigger guard until the rifle is mounted and on target.With the Gunsite ready position, the butt is on the shoulder and the muzzle oriented toward the threat, slightly depressed so you can see the threat over the sights. With the indoor ready, the butt is at shoulder level, but the muzzle is rotated down and to your off-side, positioning the rifle across your body with the muzzle pointed outside of your support-side foot. Both work with a single-point sling.
Mounting the Rifle
Proper mounting of the rifle is critical regardless of the position used. It's like the presentation of a handgun and is the basis for delivering fast, accurate hits. The toe of the buttstock should be placed high and tight, inside—not on—your shoulder. If placed on the shoulder it can work its way out during repetitive firing. If placed too low, you'll have to lower your head to see the sights. The buttstock position may vary depending on your body and the position you are using.When mounting an AR, bring the sights up to your eyes. Don't lower your eyes to the sights. The M1 tank is one of the Army's most advanced weapon systems, capable of delivering supremely fast, accurate hits. This is partially because the M1's main gun is slaved to the sight. In other words, wherever the sight looks the barrel follows. Similarly, when you look through binoculars, you don't bring them part way up and lower your head to look through them. Slave the sights of the AR to your eyes.The pistol grip of the AR should be held firmly and used to pull the rifle into your shoulder. Also, pull the rifle back with the support hand. This is easiest with a vertical fore grip, but can also be accomplished by using the magazine/magazine well, and to a lesser degree, via the common handguard hold.How tightly should the AR be held and how firmly should it be pulled back into the body? Point the AR down range, looking through the sights at a target. Increase your grip tension and reward force until the AR begins to wobble. Then, reduce pressure until the sights stabilize. Hold it firm and tight—but not too firm or too tight. Because the AR is often employed as a rapid-fire weapon system, your hold needs to be a bit more rigid than it would typically be with a bolt-action rifle.
Standing Position
Standing, off-hand is the least-stable field position. It's also the fastest to assume and it's imperative to master because it allows the most mobility and can be obtained quickly from a dead run. Ideally, feet should be about shoulder-width apart with the off-side leg/foot slightly forward. Legs should be bent a little and your shoulders vertically aligned with your toes and knees. This makes for a slightly weight-forward posture that helps with recoil. It's a fighting stance, much like you assume when shooting a pistol.From a tactical perspective, it's important to tuck your elbows in tight to the body. This keeps you compact and makes it easier to negotiate hallways and doorways and not elbow a team member in the nose. It also keeps elbows from giving you away when slicing the pie around corners and permits better control of the AR when engaging targets with fast-paced, multiple shots.Some shooters like to position their weak hand on the handguard, close in front of the magazine, using the magazine/magazine well as a vertical fore-grip. Vertical fore-grips like Crimson Trace's MVF-515, which incorporates both a light and a laser, are very popular and an alternative to this hold. A traditional mid-handguard position is also popular, and some shooters extend their weak arm, grasping the handguard as far forward as possible.For the most part, the further apart your hands, the more control you have over the muzzle. The closer together, the better your ability to move with the rifle and retain it in a struggle. This applies to all four shooting positions. A good place to start is with the mid-handguard hold, adjusting fore or aft as comfort, accuracy and the position dictate. You may locate your weak hand in a different spot depending on the shooting position. Regardless, in every case, the AR should be pulled snugly into your body with both hands.When working around or over barricades from any position, do not get too close to the barricade. It's human nature to snug up behind cover or concealment. That makes us feel warm and fuzzy, but limits mobility. Keep in mind, the further you are behind cover, the more you can move laterally and still take advantage of the concealment it offers. As a rule of thumb, keep your muzzle behind barricades unless the range to target necessitates using the barricade as a rest for stability.An important consideration when working behind barricades, from any position, is the offset between the barrel and the height of the sights on an AR. Make sure you extend the rifle out or up far enough from the barricade so the muzzle is clear. If you are using open sights or sights with no magnification where both eyes are kept open, this is an easy, quick check.
Kneeling Position
There are three kneeling positions; braced, speed and double knee. All are fast to assume, however, none offer a substantial stability increase over the standing position. Kneeling positions are how you negotiate low-hanging obstacles or make use of low to intermediate cover or barricades while still staying somewhat mobile.Assuming the speed-kneeling position is a quick, intuitive move where you just step forward with your weak side leg and drop your strong side knee to the ground. The braced-kneeling position is similar but more stable because you rest the triceps of your support arm just forward of the elevated kneecap on your weak side leg. An even more stable version of the braced-kneeling position is to sit back on your strong side foot in an almost semi-seated position.The double-kneeling position is also fast to assume because you just drop to both knees. It also allows you to adjust your elevation and even lean out around either side of a barricade by bending at the waist. From the double-kneeling position you can swiftly switch to a speed-kneeling, braced-kneeling or even prone position if the situation dictates. For additional stability, drop your rear-end back onto your heels.Though not a kneeling position, squatting puts your weapon system at the same, intermediate level as the kneeling positions. It is useful when you are moving and want to stay as mobile as possible while working around obstacles or barricades of various heights. At the lowest squat position you can even rest your triceps on your knees for added stability. With all kneeling positions, many shooters find they need to pull their support hand in a bit closer to the magazine for comfort.
Sitting Position
Sitting is the most stable of all intermediate positions but it is also the slowest to recover from or obtain. There are essentially three types of sitting positions; open leg, crossed leg and crossed ankle. All styles offer similar support and should be selected based on comfort.To enter a sitting position from standing, turn your body 45 degrees from the threat to your strong side, cross your feet and sit down.To get into this position from the speed or braced-knee position, hold the rifle toward the threat with your weak arm, place the fist or palm of your strong hand straight down to the ground and sit out, thrusting your strong leg forward as you place your rear end on the ground.If mobility is not a high priority and you must deal with a low to intermediate barricade, the sitting position is a good choice. You can place either your elbows or triceps on a forward portion of your knees and position your legs as your physique or comfort dictates. The sitting position works well with horizontal barricades, but because of limited ability to lean out, it is not a good choice for vertical barricades.
Prone Position
The prone position is the most stable of all field positions. With practice, most shooters can assume and recover from the prone position as fast as the sitting position. The downside is the limited vertical and horizontal fields of fire it offers.One of the fastest ways to assume the prone position from standing is to drop to the double-kneeling position and then roll forward onto your chest, breaking your fall with your support hand. From the sitting position, you can place your weak hand or elbow beside your butt and kind of roll on your hip, extending your weak side leg back under your strong leg as you twist toward your strong side.The prone position is the best way to work behind extremely low barricades or deliver accurate fire at long range. Both elbows should be in contact with the ground and you can even use the magazine as a monopod for extra stability. Both legs can be fully extended or the strong side leg can be bent at the knee, pulled up beside the body. This helps take pressure off your diaphragm and is helpful when maintaining the prone position for extended periods.Your toes can be pointed in or out—it does not matter—but they should not be dug into the ground unless required for you to hold your position on a slope. In the prone position your legs are mostly dead weight. If you try to alter your hold on target with your legs or toes you will loose some of the stability the prone position provides.To recover from the prone position, raise your upper body as you pull your elbows back under your chest. Place your off hand on the ground and push up to the double-kneeling position. From there you can continue shooting, move to another position or get to your feet.The key is not to just practice shooting from various positions, but to also become proficient getting into and switching between positions. Get smooth, be comfortable and hit where you aim.


